Dorm rooms are small by design. Between a twin XL bed, a tiny closet, a desk, and often a roommate’s belongings. It can feel like there’s nowhere to put anything. That’s why many students end up living with clutter, even after buying storage bins and organizers.
The problem isn’t usually a lack of storage products. It’s a lack of a storage system.
Most dorm room storage ideas focus on individual products, but the best small-space dorm rooms are organized around three simple principles: vertical storage, hidden storage, and multi-use storage. When you use all three, even a tiny dorm room can feel significantly larger and easier to manage.
In this guide, you’ll find practical form room storage ideas that work within real dorm constraints, including limited floor space, shared closets, and no drill rules. You’ll also learn how to create a simple storage system that keeps your room organized long after move-in day
The Core Rule of Dorm Storage
Before buying a single bin or shelf, understand this: in a dorm room, every storage item needs to do at least two jobs. One job isn’t enough to justify the floor space or the money.
A storage ottoman doesn’t just store. It stores and creates a surface. A closet doubler doesn’t just add hanging space. It doubles capacity and divides categories. Vacuum bags under the bed don’t just hold clothes. They compress and protect. When every piece of storage is doing double duty, you end up with a functional room. When pieces are doing single jobs, you end up with a room full of organizers that still feels cluttered.
The second thing to understand is that every dorm room has three distinct storage zones. Use all three and the room works. Use only one and it doesn’t.
The vertical zone covers everything from mid-wall to ceiling: doors, wall space, shelves above the desk, over-bed loft shelves. This zone holds items accessed regularly but not constantly. The hidden zone covers under the bed, inside luggage, inside ottomans, behind doors. This zone handles bulk storage and seasonal or less frequently used items. The daily-use zone covers the desk surface, the bedside shelf, the hooks beside the door. This zone holds only what gets touched every day. Everything else gets out of it.
Work out which zone each item belongs in before deciding where it goes. That decision alone eliminates most dorm room clutter.
Quick Dorm Room Storage Ideas at a Glance
If you’re looking for fast inspiration, start with these space-saving dorm storage ideas:
- Over-the-door organizers
- Rolling under-bed storage bins
- Vacuum storage bags
- Bed risers
- Storage ottomans
- Desktop riser shelves
- Adhesive wall hooks
- Stackable shelving units
- Tension rods
- Cascading hangers
- Drawer organizer
- Cable management trays
- Over-the-door hooks
- Shoe stacking racks
- Hanging closet organizers
The rest of this guide explains where each solution works best and how to combine them into a system that keeps clutter under control.
Check Dorm Rules Before Buying Storage
Before investing in storage products, check your dorm room’s housing guidelines.
Some dorm rooms allow bed risers, lofted beds, shelving units, and adhesive hooks. Others restrict furniture additions or wall-mounted accessories. A five-minute check now can save you from buying storage solutions that aren’t permitted.
Once you know what your dorm allows, you can build a storage system that works without creating move-in headaches.
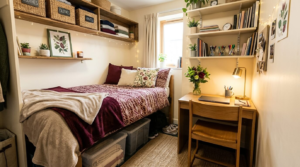
Vertical Storage Solutions (When Floor Space Is Gone)
If you’re not using the vertical space in your dorm room, you’re already out of room. The floor fills up fast. The walls and door are where the capacity is.
Over-the-door organizers
The back of the dorm room door is the most underused storage surface in the room. An over-door pocket organizer handles shoes, toiletries, snacks, cables, jewelry and small supplies in a visible and accessible format. No drilling, no adhesive, no damage at move-out.
A mirrored over-door jewelry armoire goes further, adding a full-length mirror and dedicated jewelry storage in one piece that hooks over the door and uses zero wall space.
For the specific products that work best on dorm room doors, the post on the best over-the-door storage ideas for small dorm rooms covers each type.
Hanging wall pockets and damage-free shelves
On painted drywall, adhesive-mounted hanging wall pockets and floating shelf strips hold lightweight items at eye level without drilling. Books, small plants, an alarm clock, a lightweight speaker: all manageable on properly rated adhesive shelves installed on the right surface.
On cinder block walls, adhesive solutions are unreliable. Use leaning shelf units or tension pole systems instead. The surface type determines the solution. Check before buying.
Stackable shelving units
A freestanding stackable shelving unit beside the desk or against the wall behind the door uses the full height of the room in a small floor footprint. Four to five levels of shelving handle books, supplies, folded clothing in baskets and personal items without touching the walls.
Position it in a corner or behind the door where it uses space that isn’t part of the main circulation path through the room.
Tension rods as instant closet dividers
A tension rod fitted horizontally below the main closet rail creates a second hanging level for shorter items instantly. No tools, no damage, no permanent changes. A second tension rod fitted vertically inside the closet divides the space into two clearly defined sections, one per person in a shared closet. Tension rods are cheap and add more functional closet organization than most purpose-built closet systems at ten times the price.
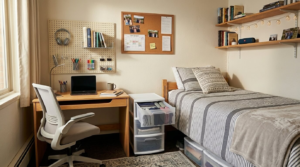
Under-Bed Storage Systems That Actually Work (Not Clutter Dumping)
Under-bed storage only works when it’s organized by category. Sliding random items under the bed and hoping for the best is how the under-bed zone becomes a place where things disappear.
A proper under-bed system treats that space as a structured storage zone with a specific job for each container.
Rolling bins versus vacuum bags
Rolling bins are the right choice for items accessed regularly, everyday shoes, school supplies backup, snack storage. They slide out easily, stay visible and accessible, and roll back without effort.
Vacuum compression bags are the right choice for bulk items accessed occasionally, out-of-season clothes, spare comforters, formal wear. They compress dramatically, protect against dust and moisture, and store flat in the space rolling bins can’t use.
Use both. Rolling bins at the front of the under-bed zone for daily access. Vacuum bags flat at the back for long-term storage.
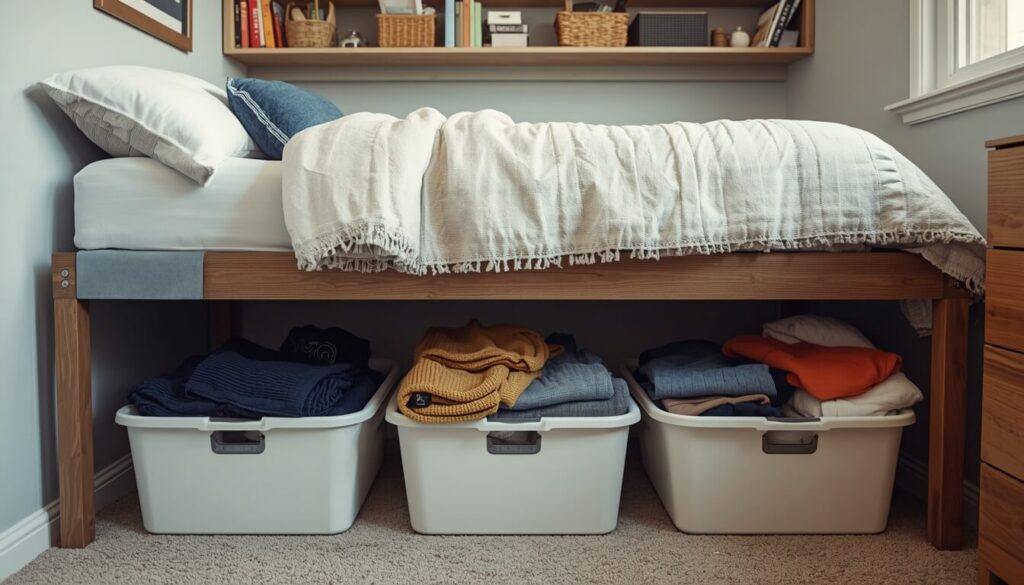
DIY risers for extra clearance
Standard bed risers add 3 to 8 inches of clearance under the frame and cost little. That extra clearance is the difference between the under-bed zone fitting rolling bins and vacuum bags comfortably or being too low for anything useful.
Measure the current clearance before buying risers and buy the height that gets you to at least 12 inches of clearance for the most storage flexibility.
Categorized storage under the bed
Label every container in the under-bed zone before it goes under. Clothes, school supplies, snacks and essentials, seasonal items: each category gets its own labeled container and its own position.
The front row is daily or weekly access. The back row is monthly or seasonal. This structure means nothing gets lost and retrieving a specific item takes seconds rather than a full excavation.
Closet Hacks for Shared or Tiny Dorm Closets
When you share a closet or have half a rail, organization becomes allocation, not storage. The question isn’t just how to store things. It’s how to use every inch of the space that’s yours without letting it bleed into the other person’s half.
Double-hanging rods
A closet doubler that hooks onto the existing rail and adds a second shorter rail beneath it doubles the hanging capacity in minutes. The top rail handles full-length items. The lower rail handles shorter pieces, shirts, jackets, folded pants on clip hangers.
The closet floor, previously crowded with everything that didn’t fit, opens up for a shoe rack or a small set of drawers. This is the single highest-impact closet addition available in a dorm room.
Cascading hangers
Cascading hanger hooks link multiple hangers vertically on one hook position on the rail. Five shirts occupy the space of one. For a student with a limited rail section, cascading hangers recover a significant amount of hanging capacity without any additional hardware.
Pair them with slim velvet hangers for maximum space efficiency.
Labeled zones per category
Divide the closet rail into clear zones before hanging anything. Tops together, bottoms together, outerwear together.
A small divider clip on the rail marks each boundary. When everything has a category and a zone, finding things takes seconds and putting things back requires no decision-making.
In a shared closet, each person’s half gets its own zone structure so neither person’s system interferes with the other’s.
Shoe stacking systems
The floor of the closet is for shoes. A tiered shoe rack, an over-door shoe organizer on the inside of the closet door, or a stacking shoe shelf makes the most of that floor space without letting shoes pile up loosely. Keep everyday pairs at the front. Less-worn pairs go toward the back. For the closet organization products that work specifically in dorm-sized closets, the guide to the best closet organizers for tiny dorm closets covers the full range.
Desk Storage That Doesn’t Kill Study Space
The rule for a dorm desk is simple: the top is brain space, the bottom is storage only. The surface is for active work. Everything else lives on a shelf, in a drawer or beside the desk.
Vertical desk shelves
A desktop riser shelf on the back section of the desk creates a second level above the surface without taking up usable work space. Books, binders and supplies go on the riser.
The desk surface below stays clear for the laptop, a notebook and whatever the current task requires.
Floating shelves on the wall above the desk extend this further, taking books and supplies off the desk entirely and putting them at eye level within reach.
Drawer organizers
The desk drawer, if there is one, becomes a dumping ground without organizers inside it. Adjustable drawer dividers create fixed sections for pens, chargers, sticky notes, small tools and the miscellaneous items that accumulate during a semester.
Everything has a section. Finding anything takes three seconds. The drawer stays functional for the full year rather than becoming a place where things go to disappear.
Cable containment
Loose cables on and around the desk make the whole room feel messier than it is. A cable management tray under the desk holds the power strip and excess cable length out of sight. Adhesive cable clips route individual cables along the back edge of the desk. A charging station on the desk surface or on the shelf above keeps phone and device cables contained in one spot.
Twenty minutes on setup day eliminates a semester of cable chaos. For the full desk setup including cable management, the post on how to set up a productive dorm room desk in a small space covers the complete setup from surface to wall storage.
Hidden Storage Most Students Ignore
Hidden storage is what separates a dorm room that looks clean from one that looks cluttered. Everything visible needs to look good all the time. Everything hidden just needs to be accessible when needed. Use the hidden zone aggressively.
Inside luggage and suitcases
An empty suitcase under the bed is wasted space. Fill it with out-of-season clothing, formal wear, spare bedding or anything needed once a semester. Label the outside with a luggage tag noting the contents so retrieval is fast.
A suitcase that’s storing something earns its space. One that’s just sitting there doesn’t. For the full range of suitcase storage options in a dorm room, the post on where to store suitcases in a small dorm room covers every position and configuration.
Inside storage ottomans
A storage ottoman at the foot of the bed holds spare bedding, out-of-rotation clothing, gym gear and bulky items that have no other home.
The lid closes and the room looks like nothing is being stored there. It functions as a surface, as occasional seating and as hidden storage in one footprint.
Check the school’s furniture policy before bringing one since some dorms restrict additional furniture.
Behind-door hooks for bags
Bags left on the desk chair or the floor are a constant source of visual clutter. A hook on the back of the door or beside the closet gives every bag a fixed home that takes two seconds to use.
Daily bag goes on the hook when you get back. It’s off the floor, off the chair and out of the way. A multi-hook rack handles multiple bags without competing for wall space.
Inside bedding storage bags
A spare comforter set stored in a large zippered bedding bag under the bed stays dust-free, compressed and contained. It doesn’t take up shelf space, doesn’t sit loose in a pile and doesn’t need a dedicated storage piece to manage it.
A labeled bedding bag per set keeps spare bedding organized and retrievable on laundry day without searching.
Budget Dorm Storage Setup (Under $50)
You don’t need a room full of organizers to make a small dorm functional. A few carefully chosen pieces can solve most storage problems for less than $50.
Over-the door organizer
An over-door pocket organizer instantly adds storage without using valuable floor space. Use it for shoes, toiletries, cleaning supplies, and accessories.
Bed risers
If your dorm allows them, bed riders create one of largest storage areas in the room. Even a few extra inches of clearance can make space for rolling bins and vacuum storage bags.
Rolling under-bed bins
These provide easy access to everyday items while making use of space that would otherwise site empty.
Adhesive hooks
Hooks are one of the cheapest ways to reduce clutter. Use them for backpacks, towels, jackets, and frequently used accessories.
Together, these four items create storage in the vertical zone. Hidden zone, and daily-use zone without requiring a large budget or permanent modifications.
Common Dorm Storage Mistakes
Buying storage before decluttering is the most expensive mistake. More storage for too many items produces a fuller room, not a better-organized one. Declutter first. Figure out what actually needs to be stored. Then buy storage sized for that amount.
Using bins without categories is the second. An unlabeled bin becomes a dumping ground within a week. Every bin, basket and box needs a specific category before anything goes inside it. The category determines where the container lives and makes returning items to it automatic rather than effortful.
Ignoring vertical space is the third and most common. Students look at 150 square feet of floor and see the problem. The solution is above the floor. Doors, walls, the space above the desk, the area over the bed: all of it is usable storage that most students leave empty for the entire year.
Duplicating storage types is the fourth. Three different types of small desktop organizers doing variations of the same job wastes money and creates visual noise. One good solution per problem. That’s the standard.
Simple Dorm Storage Setup Plan
Use this sequence. It produces a functional room faster than any other approach.
Step one: declutter before anything else goes away. Anything not needed at school this semester goes home or goes. Non-negotiable.
Step two: divide the room into the three zones. Identify the vertical zone, the hidden zone and the daily-use zone in the specific room. Mark the boundaries mentally before buying or placing anything.
Step three: assign a storage type to each zone. Vertical zone gets over-door organizers, adhesive hooks, floating shelves and tall freestanding units. Hidden zone gets under-bed bins, vacuum bags, suitcase storage and ottomans. Daily-use zone gets desk organizers, a bedside shelf and hooks for what gets used every day.
Step four: install vertical solutions first. The door, the wall above the desk, the shelving unit: set these up before anything is unpacked so the storage infrastructure exists before the items need homes.
Step five: set up the under-bed zone. Measure clearance, install risers if needed, place labeled bins and vacuum bags in the right positions.
Step six: optimize the desk last. Clear the surface, add the riser shelf and organizers, manage the cables. The desk is the final zone to set up because everything else in the room affects what ends up on it. For the complete room organization guide that walks through every zone in detail, how to organize a small dorm room when space is limited covers the full approach from move-in day through the semester.
Small Dorm Room Does Not Mean Limited Storage
A small dorm room can hold far more than most students expect. The secret isn’t adding more organizers. It is using the available space more intentionally.
When you combine vertical storage, hidden storage, and multi-use furniture, you create a room that feels larger, stays organized longer, and functions better throughout the semester.
Start with the three storage zones. Add solutions that work with your space constraints instead of constantly fighting against them.